Testing Calamares with KDE Neon
Nov 5, 2021
KDE neon is a bootable ISO image with a stable Ubuntu base and recent – often a nightly build – KDE software on top. That’s a great way to test KDE software. KDE neon uses Calamares as the installer and includes recent – sometimes nightly – builds of Calamares. That’s a great way to test Calamares, too. But you don’t have to wait for new ISO images to test Calamares. This post explains how to build and run the latest Calamares from a not-latest KDE neon image.
The technique here is not specific to KDE neon. It also works on KaOS, on Manjaro, on ArcoLinux and others. Paths will need some modification, and things may look a little different, but the overall flow is the same.
Virtual Machine Setup
I’m going to assume a virtual machine is being used, because that offers a safety net when running installers – and then modifying them and running them again. My VM setup looks like this:
- VirtualBox
- 4 virtual cores
- 8GiB RAM
- 32GB disk
The reason for picking a relatively “fat” VM is that we’re going to be building Calamares in the VM, and that takes some resources and I’d like it to be fast-enough.
- Download a KDE neon developer edition from the KDE neon download page. This is with pre-release KDE software, so it might be wonky one day and solid the next. Picking the developer edition just means that more tools are pre-installed, reducing the amount of work done inside the VM to get it to a useful-development-state.
- Boot the ISO image. After a while, it should come up with a KDE Plasma desktop and an installer icon.
Virtual Machine Developer Preparation
With the VM running, we need to update it to build Calamares. The installer icon on the desktop isn’t going to be useful, either, so we’ll remove that.
- Start
konsole(e.g. alt-space, type konsole, hit enter – but there are other ways, too). - Remove the installer icon:
rm Desktop/calamares.desktop - Fetch the Calamares developer-preparation script. This is a Python script that
knows about some distributions and will try to install dependencies and
build Calamares:
curl -o dp.py https://calamares.io/deploycala.py - As a general rule, “fetch this script from the Internet and run it” should leave you shaking your head. The source is available. It is published on the website at a shorter URL. You can also go through the install-dependencies, git clone, cmake, build steps by hand if you like. The script is there to make it simpler (for me, in particular, and I trust myself).
- Run the script, while shaking your head:
python3 dp.py -N -n - The script won’t self-update (
-N), so it runs exactly what you downloaded, and won’t upgrade the system (-n). The latter means that it won’t pull in whatever updates to system libraries, Qt, etc. have happened since the ISO image was made. With KDE neon, that’s not an issue because it has a stable base and up-to-date KDE bits. Then the script installs development dependencies and kicks off a build of the calamares (main development) branch, freshly-checked out from git. This will take a couple of minutes.
At the end, on KDE neon the script will complain that a backup of Calamares configuration can not be restored, and then tell you what it built.
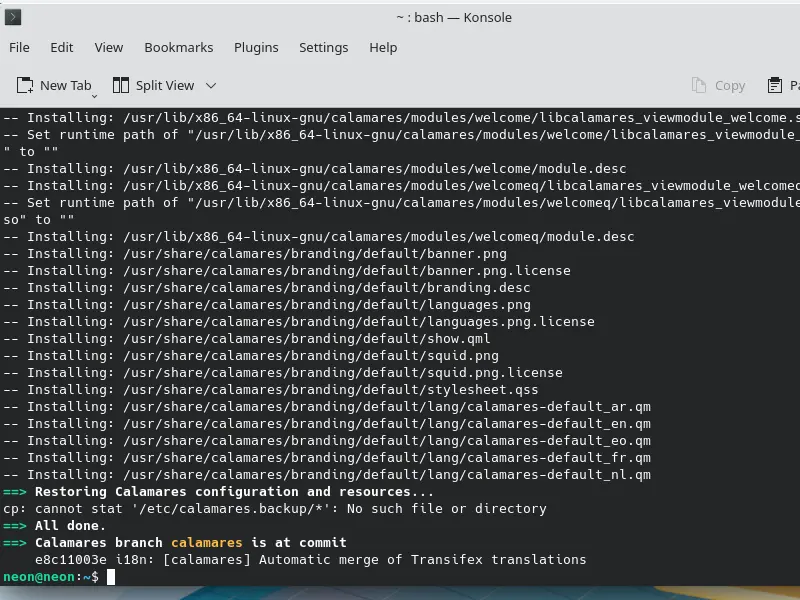
(Click for larger screenshot) If it doesn’t end with a positive message, join the conversation on Matrix or IRC and share a screenshot / error messages and we’ll try to figure it out.
Using the Newly-Built Calamares
The Calamares source is checked-out in ~/calamares/ and the build is in ~/calamares/build/.
You can make changes to the sources, and then build-and-install again with
cd ~/calamares/build ; sudo make -j install
We’ll repeat the build-and-install loop while testing things.
KDE neon specific
We want to keep
the KDE neon configuration and data files, but run with the latest code.
On KDE neon, Calamares configurations live in an unusual place. Just running calamares as usual
will fail to find the configuration files and the branding-data.
So we need to tweak the configuration on the ISO image a little:
the QML directory for KDE neon’s slideshow needs to be linked to the right spot:
sudo ln -s /usr/share/calamares/qml /calamares/desktop
To run Calamares, we need to tell it to fetch configurations from /calamares/desktop,
which is where KDE neon puts them:
sudo calamares -d -c /calamares/desktop
The -d flag puts Calamares in developer-mode, which means
it will log lots of things and offer the developer-console.
Other distributions
If the distribution puts Calamares configurations into the
regular locations, then all you need is sudo calamares -d
Modifying Calamares
With a source checkout in the VM, and the possibility to modify-install-run, it’s relatively easy to iterate on changes to a module in Calamares. The one thing to remember is do not click Restart now at the end of the installation, or you’ll lose all the changes you have made. Getting the changes out of the VM to a place you can store them is left as an exercise – because approaches will vary wildly.
I often end up using netcat,
nc, to dump git diffs from inside the VM to the host, where I can clean them up, commit and push and then fetch back into the VM for another try. On the host,nc -l 1234and in the VM,git diff | nc host 1234(assuming DNS understandshostas a name).
Takeaway
Doing Calamares development on a live-ISO system in a VM is a viable way of testing “destructive” things in an installer, while the scripts make it easy to set up on a fresh VM each time.